I’ve been exploring Kubernetes and GitLab for quite some time. Until recently, I’ve relied on GitHub’s free runners or GitLab runners hosted on private instances. I’ve often using manually installed executables directly on production servers to automate my deployment processes. However, this approach presented a few challenges.
One concern with free runners is the lack of privacy. Pipeline job details are publicly visible, which could expose sensitive information if building critical infrastructure components. For example, someone could observe the steps involved in creating a sensitive environment. Clearly, that’s not a desirable situation.
Deploying runners directly on production servers, especially if those servers are also hosting other services, wastes valuable resources that should be dedicated to running the primary application. This isn’t an ideal solution either.
Another option is to rent a dedicated server, like a VPS, for a modest cost. While seemingly straightforward, this comes with the risk of losing everything if you fail to pay the rental fee. Your VPS, and the entire setup you’ve invested time in, could disappear. For just a little more money, you could purchase your own private server, granting you complete control and flexibility. Imagine taking a three-month vacation, shutting down your home lab, and returning to find everything exactly as you left it, without ongoing rental fees. Great, isn’t it?
These factors ultimately led me to build a home Kubernetes cluster to fully leverage its capabilities and run my own GitLab runners within my home lab.
Prerequisites
Installing GitLab requires a few additional things you might need before attempting a pure installation.
- First, you’ll need a GitLab account, either a private one or one from the official gitlab.com domain (I used the latter).
- Second, you’ll need a prepared Kubernetes cluster to begin the installation. If you’re interested, I’ve written an article on how to set up your own home Kubernetes cluster.
Architecture
In this post, I will guide you through installing the latest GitLab Runner on a Kubernetes cluster using GitLab’s official Helm charts.
Below is an overview of how the home cluster and main GitLab instance will look in our example.

Pros and cons of using different executors
Before diving into the installation process, let’s weigh the pros and cons of using different executors. It’s important to understand why the Kubernetes executor might be preferable or less useful depending on the specific situation, compared to for example a simpler Docker executor.
Shell Executor
| 🛑 cons | ✅ pros |
|---|---|
| hard to scale | setup is very simple |
| no isolation between jobs | just works on local pc |
| works only on local machine | job starts quickly |
| the runner host is vulnerable | great for basic, short tasks |
| environment consistency is a problem | |
| requires maintaining host environment |
The Shell executor appears to offer a fast and straightforward setup for testing. It seems well-suited for quickly testing very basic, small tasks. However, for more complex operations, it’s likely not the best choice.
Docker executor
| 🛑 cons | ✅ pros |
|---|---|
| difficult to scale | relative easy to setup |
| must use docker daemon (not other alternatives) | clean environment per job |
| resources works for entire docker daemon | allow to define resources for docker daemon |
| just works on local pc |
The Docker executor presents a reasonable solution, providing a good balance of features. It offers relatively easy setup and a clean environment per job. However, it’s not without limitations, as scaling can be challenging if you have a large number of tasks to execute. Resource specifications apply to the overall daemon service, which lacks the granularity found in Kubernetes.
Kubernetes executor
| 🛑 cons | ✅ pros |
|---|---|
| setup that could be complex | offer excellent scalability |
| works usually in distributed setup | full job isolation |
| requires a Kubernetes cluster | full automation for jobs and cleanup |
| maintenance require more knowledge | allow to define specific resources management |
| Kubernetes has a steep learning curve | adding new instances integrates quickly with Kubernetes infrastructure |
| network latency can be a problem | high availability by defining multiple runners |
It would be disingenuous to claim the Kubernetes executor is the absolute best option simply by comparing pros and cons. It’s a truly impressive solution, but it appears most suitable for more advanced users or frequent, complex scenarios. A key consideration is the maintenance overhead and the specialized knowledge required to set it up. While GitLab Runner configuration is straightforward, managing a Kubernetes cluster alongside it can represent a significant workload.
However, if you already have a Kubernetes cluster in your local environment or in the cloud, leveraging those resources to offload job execution from your local machine, which is anyway often busy with other tasks like running your IDEs, local Docker images, Browsers or utilizing LLMs models. You’d typically need a very powerful machine to handle all of that. Delegating this task to a pool of dedicated resources sounds like a great, win-win approach.
Job Flow Execution
Let’s explore how the job execution flow works. We’ll consider a typical, straightforward execution: when a developer pushes code to a pull request (in GitLab, this is called a Merge Request), it’s checked by the runners (using Dockerfile, shellcheck, and linting tests).
How this works:
- We define our tasks file
gitlab-ci.yamlin the repository. - A developer pushes code to a branch.
- GitLab detects new commits and triggers the pipeline based on the job definition.
- Runners assigned to the project, for specific tags or as general runners, periodically check for jobs to execute and retrieve them.
- The job is executed on the runner and the results are returned to the main GitLab instance.
- The results can be viewed in the job execution summary.
As you can see, the job flow architecture is quite simple. It consists of the main code host (GitLab) and the runners (GitLab Runners). This architecture allows us to easily deploy code to a single instance and specify multiple runners, each serving a different purpose (production, staging, team 1, team 2, etc.).
Installing gitlab-runner on Kubernetes cluster
Installation
Make sure you have access to your k8s cluster (master node, or control plane). You should get similar message as below.
$ kubectl cluster-info
Kubernetes control plane is running at https://192.168.178.200:6443
CoreDNS is running at https://192.168.178.200:6443/api/v1/namespaces/kube-system/services/kube-dns:dns/proxy

To further debug and diagnose cluster problems, use 'kubectl cluster-info dump'.
Further, confirm you have a helm installed (best from version 3.0 above.)
$ helm version
version.BuildInfo{Version:"v3.18.3", GitCommit:"6838ebcf265a3842d1433956e8a622e3290cf324", GitTreeState:"clean", GoVersion:"go1.24.4"}
Get token for gitlab runner
- Login to gitlab
-
Go to your project and enter the left sidebar menu Settings -> CI-CD
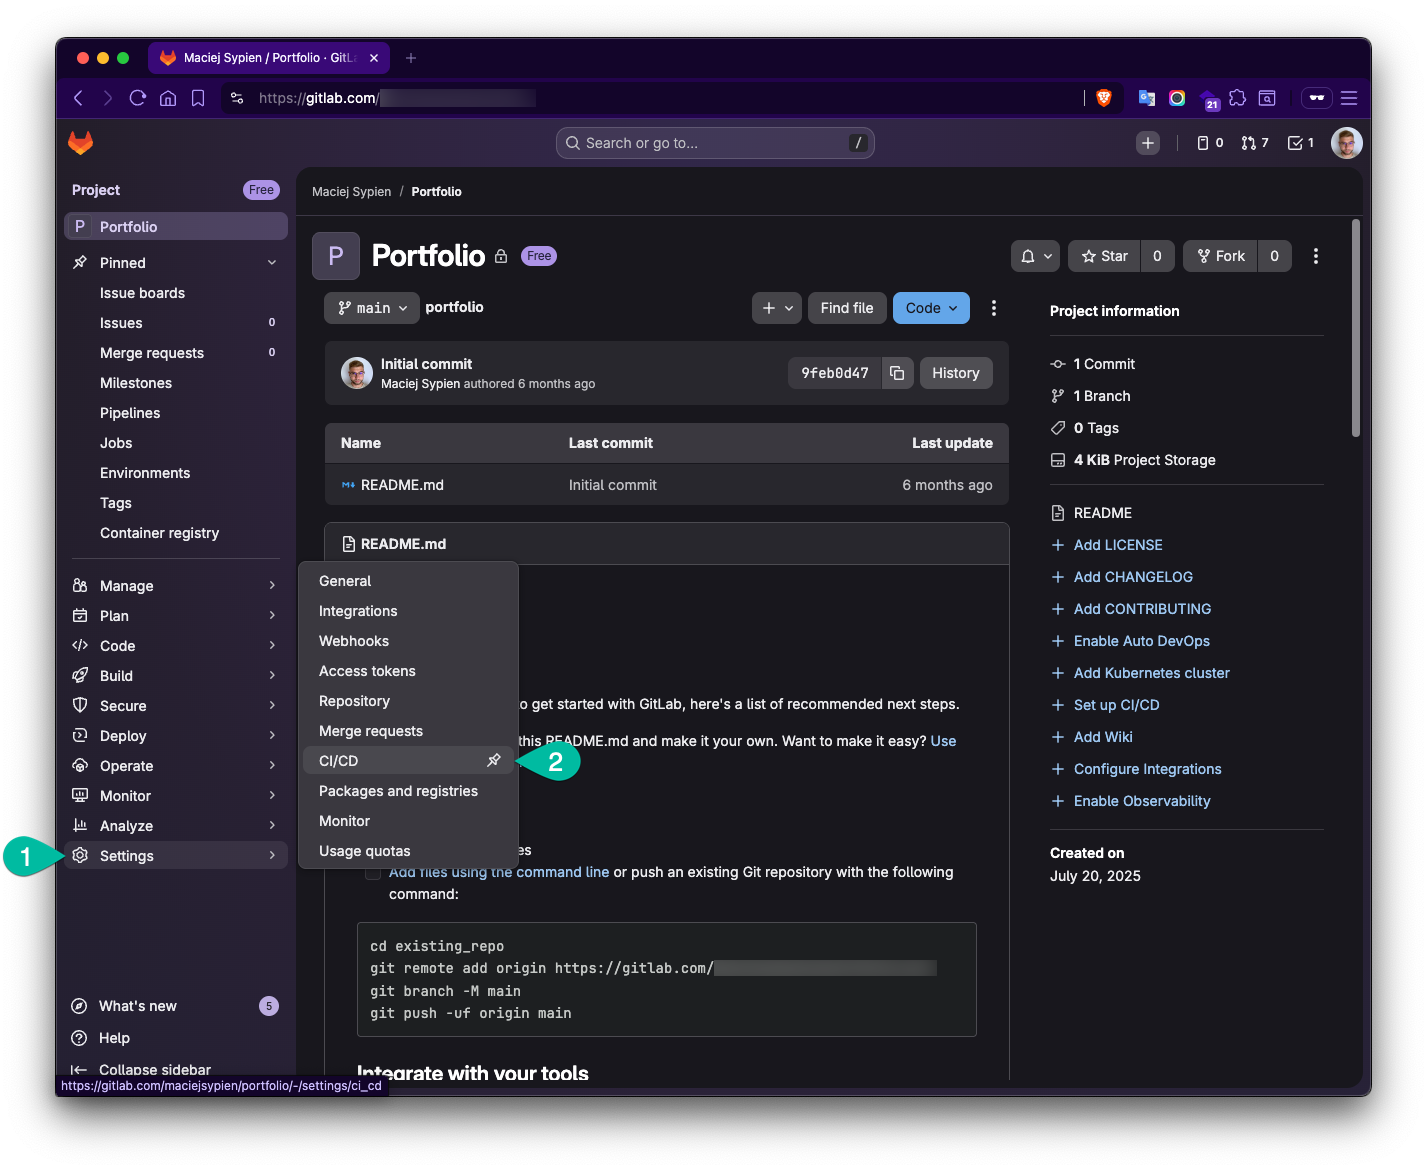
-
Next open Runners section and click
Create project runner.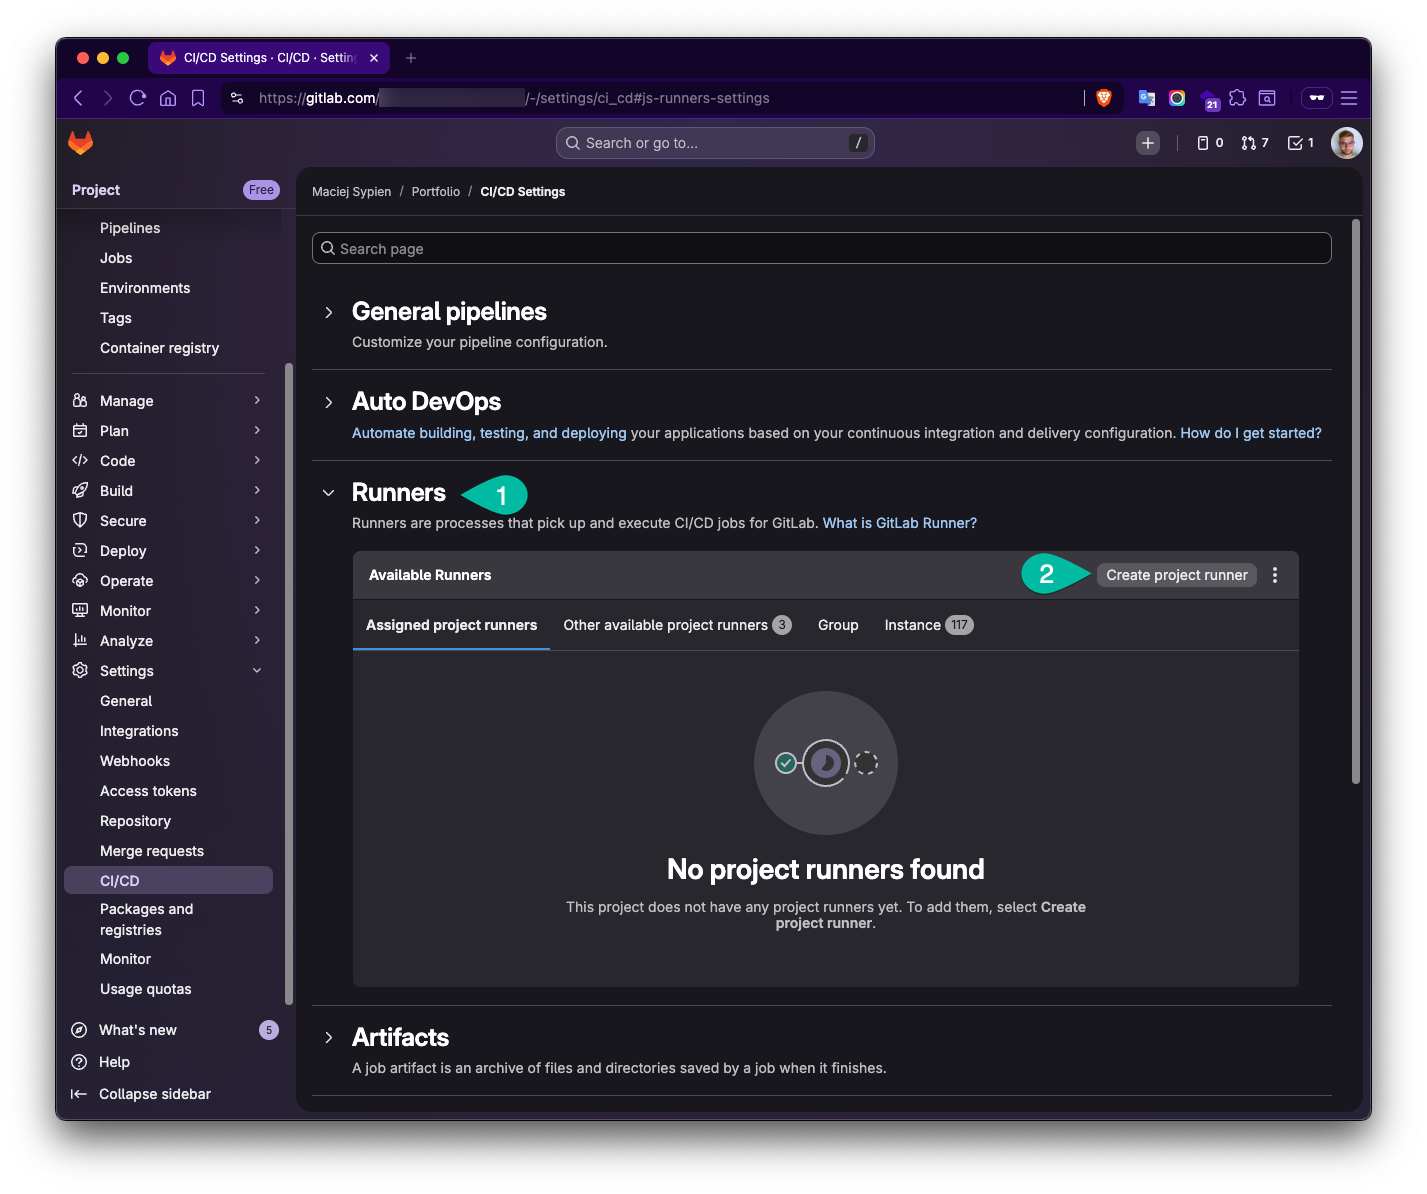
- Fill the data to create new project and define following things:
- Tags: In the example I used following:
k8s,kubernetes,docker,linux,homecluster. Tags give you a lever to execute a job on a specific runner. - Run untagged jobs: This option allows you to use pick by this runner any job assigned to this project.
- Description (optional): Mostly to orientate yourself which runner it describes.
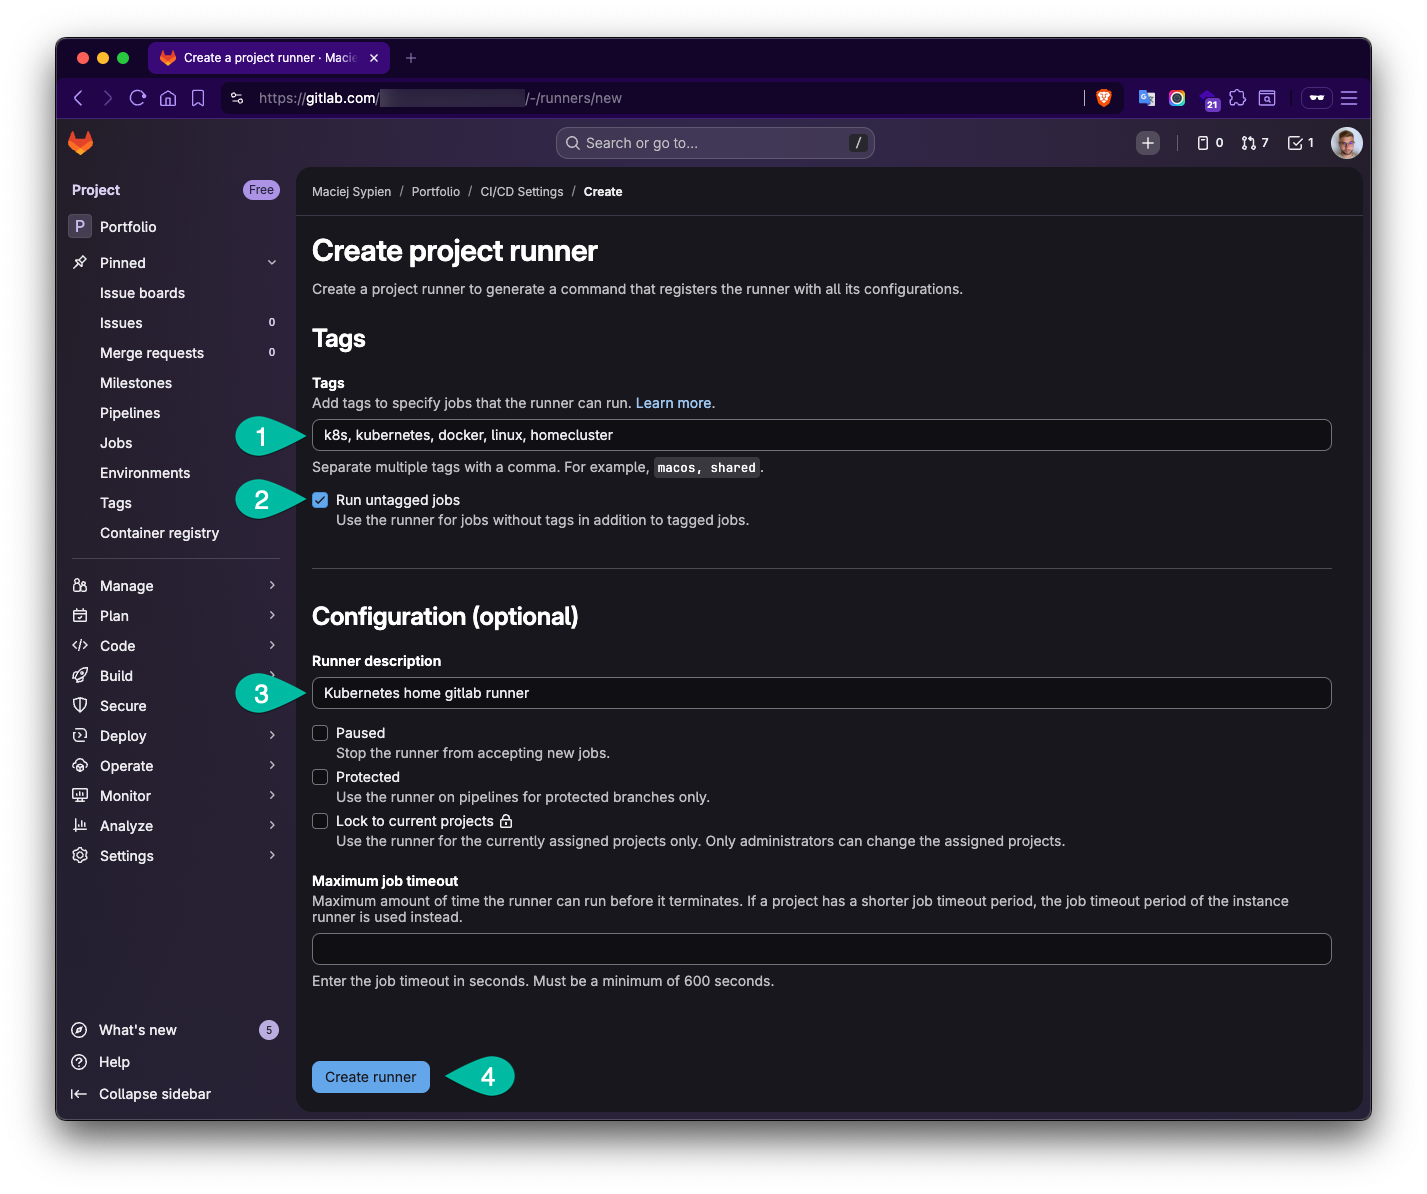
- Tags: In the example I used following:
-
Write down the token and store it save place! - we will need this token in later steps.
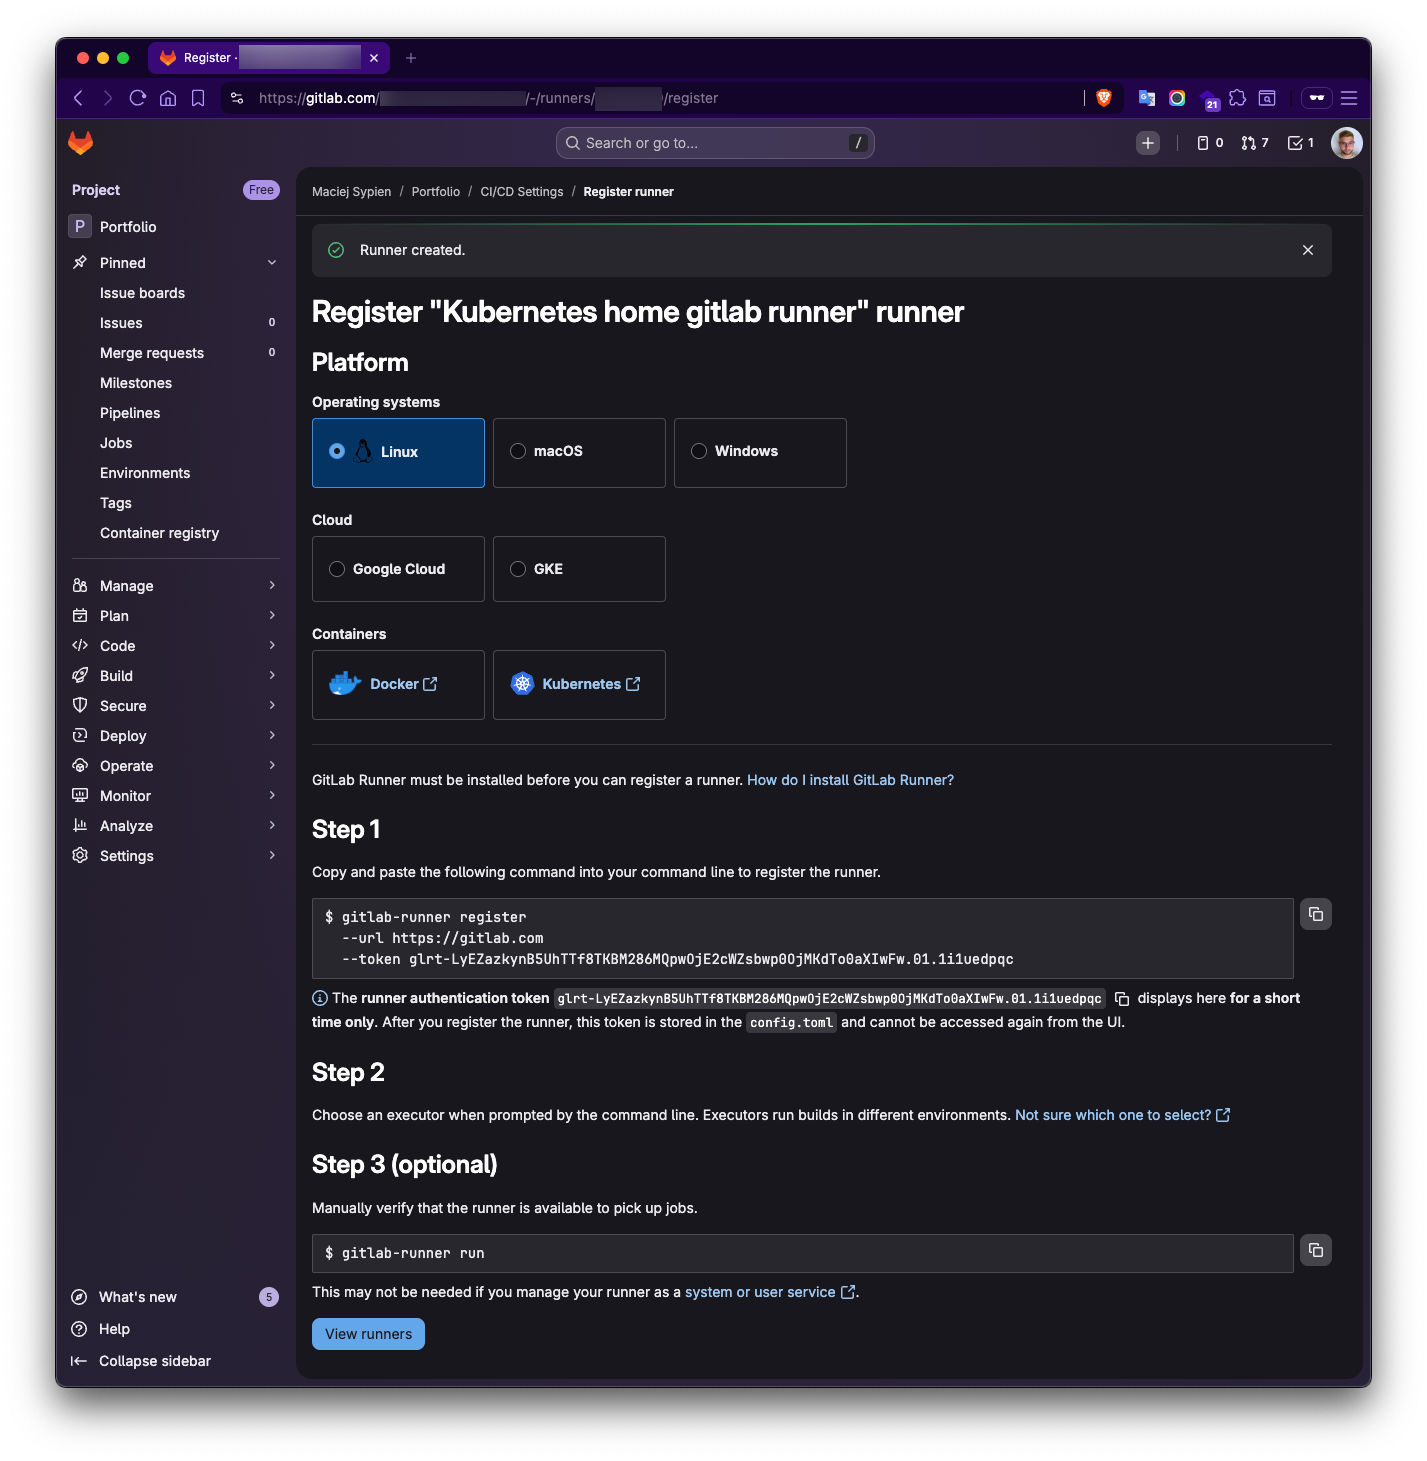
Notice: If case you wonder, for the security reason, the token I left on screenshot is already invalid 😉. I wanted to leave it on screenshot, to document it and present you as much possible also with how the real token looks like.
Install gitlab runner Helm Chart
Add gitlab Helm repo.
helm repo add gitlab https://charts.gitlab.io
helm repo update
Create new namespace for the gitlab runner.
kubectl create namespace gitlab
Verify and checkout to new namespace.
$ kubectl describe namespace gitlab
Name:         gitlab
Labels:       kubernetes.io/metadata.name=gitlab
Annotations:  <none>
Status:       Active

No resource quota.

No LimitRange resource.

# set current context to gitlab namespace
$ kubectl config set-context --current --namespace=gitlab
Configure the gitlab-runner
In this section, we’ll use Helm to install the GitLab Runner. This involves configuring a YAML file with the necessary settings. You can find a complete example in my public GitHub repository: https://github.com/egel/k8s-gitlab-runner.
To illustrate the configuration, I’m using my personal home cluster, which consists of three nodes. I’ve allocated two nodes specifically for the Runners. The goal is to set up two active Runners with a total of four concurrent jobs, resulting in eight concurrent jobs overall – a setup that should be suitable for most use cases.
Each node in the cluster has 2 CPUs and 16GB of RAM. For building and pushing multiple final Docker images to a registry, I’ve provisioned 4GB of memory per job, which I believe is sufficient.
Enough with the setup details, let’s dive into defining the gitlab-runner-values.yaml file. I’ll break down each part in the following steps to provide a comprehensive understanding.
---
# GitLab connection
gitlabUrl: https://gitlab.com/ # or your self-hosted URL
runnerToken: "PLACE YOUR GITLAB RUNNER TOKEN HERE" # paste your token from previous steps or better use a secret (see desc below)

imagePullPolicy: IfNotPresent

# Runner image
image:
  registry: docker.io
  image: gitlab/gitlab-runner
  tag: ubuntu

# Scaling
replicas: 2 # 2 manager pods for HA
concurrent: 4 # each manager handles 4 jobs max

checkInterval: 15 # define in sec how often the runner checks for new jobs

# Security - in some helm/kubernetes collections there is problem with permissions
# like "mkdir: cannot create directory '/home/gitlab-runner': Permission denied".
# See: https://docs.gitlab.com/runner/install/kubernetes_helm_chart_configuration/#switch-to-the-ubuntu-based-gitlab-runner-docker-image)
securityContext:
  fsGroup: 999
  runAsUser: 999

serviceAccount:
  create: true
rbac:
  create: true
  clusterWideAccess: true
  rules:
    - resources: ["events"]
      verbs: ["list", "watch"]
    - resources: ["namespaces"]
      verbs: ["create", "delete"]
    - resources: ["pods"]
      verbs: ["create", "delete", "get"]
    - apiGroups: [""]
      resources: ["pods/attach", "pods/exec"]
      verbs: ["get", "create", "patch", "delete"]
    - apiGroups: [""]
      resources: ["pods/log"]
      verbs: ["get", "list"]
    - resources: ["secrets"]
      verbs: ["create", "delete", "get", "update"]
    - resources: ["serviceaccounts"]
      verbs: ["get"]
    - resources: ["services"]
      verbs: ["create", "get"]

# Kubernetes executor config
runners:
  config: |
    [[runners]]
      # Fix request concurrency for multiple runners
      request_concurrency = 3  # Default: only 3 request at a time
      limit = 10               # Can handle 10 jobs, but only 3 request slot

      [runners.kubernetes]
        namespace = ""
        image = "alpine:latest"

        # Resource limits (per job pod)
        cpu_limit = "1"
        memory_limit = "4Gi"
        cpu_request = "500m"
        memory_request = "512Mi"

        # Service containers (e.g., DinD)
        service_cpu_limit = "1"
        service_memory_limit = "4Gi"

        # Enable privileged mode (needed for Docker-in-Docker)
        privileged = true
The configuration is pretty straightforward. First, we define credentials for connecting to your GitLab instance. I strongly recommend storing these tokens within a Kubernetes secret object for best practices. Refer to the official documentation for details on setting up the certsSecretName. You can certainly use plain text tokens initially and revisit this later once everything is up and running.
Next, you specify the Docker image your Runner will use. I personally used ubuntu as a base image.
Pro Tip: This is a great place to save time and resources! You can build a custom Docker image based on your chosen base image and pre-install all the software you commonly use when working on jobs. This avoids repetitive installations and reduces bandwidth consumption. This approach leverages the “Docker-in-Docker” (DinD) concept. I created a custom image specifically for this purpose that you might find useful. It’s available on Docker Hub: https://hub.docker.com/r/egel/docker-for-gitlab-ci. While it might not always be the absolute latest base image, it’s a solid starting point. Feel free to explore, modify, and adapt it to your needs – it’s all public!
In the security section, we’ll explore the necessary permissions for the Runner to execute jobs. I found it essential to set up the securityContext with a value of 999 during my setup. You can find more information on this in the official documentation: https://docs.gitlab.com/runner/install/kubernetes_helm_chart_configuration/#switch-to-the-ubuntu-based-gitlab-runner-docker-image.
For better organization and easier maintenance, I recommend creating a dedicated service account. Implementing the recommended RBAC rules from the official documentation is also a good idea. See the docs here https://docs.gitlab.com/runner/executors/kubernetes/#configure-runner-api-permissions or extract them from sample chart values with:
helm show values gitlab/gitlab-runner

# or save the output to sample file for convenient usage
helm show values gitlab/gitlab-runner > default-values.yaml
Finally, if you’re using a multi-tenant configuration, pay attention to adjusting the requestConcurrency and limit settings. More details are available in the official documentation: https://docs.gitlab.com/runner/configuration/advanced-configuration/#configuration-warnings. Otherwise, you might encounter a warning in your logs during the final setup stages like this one below:
WARNING: CONFIGURATION: Long polling issues detected.
Issues found:
  - Request bottleneck: 1 runners have request_concurrency=1, causing job delays during long polling
This can cause job delays matching your GitLab instance's long polling timeout.
Recommended solutions:
  1. Increase 'request_concurrency' to 2-4 for 1 runners currently using request_concurrency=1
Note: The 'FF_USE_ADAPTIVE_REQUEST_CONCURRENCY' feature flag can help automatically adjust request_concurrency based on workload.
This message will be printed each time the configuration is reloaded if the issues persist.
See documentation: https://docs.gitlab.com/runner/configuration/advanced-configuration.html#long-polling-issues  builds=0 max_builds=4
Install gitlab-runner from the Helm chart
# check the version of gitlab-runner helm chart and pick one
helm search repo -l gitlab/gitlab-runner

# install the runner (I manually pick the latest version, but dropping it will install latest as well)
helm install gitlab-runner --namespace gitlab --version 0.84.2 -f gitlab-runner-values.yaml gitlab/gitlab-runner
the runner should schedule all objects we need. Now let’s watch what we have got back in k8s namespace:
$ kubectl get pods --namespace gitlab
NAME                           READY   STATUS    RESTARTS   AGE
gitlab-runner-fcd689ff-hh8nb   1/1     Running   0          73m
gitlab-runner-fcd689ff-kwpgm   1/1     Running   0          73m
Now, let’s check what logs says about our installation to be sure all works as expected:
kubectl logs -n gitlab -l app=gitlab-runner --tail=20
If you see not errors that’s amazing! That will be all for the runner configuration. Now we can setup your project’s gitlab-ci.yaml file, to trigger our pipeline and test the project.
Gitlab CI yaml
As mentioned shorly before, for this part we will need to setup the gitlab-ci.yaml for our project. Let’s take a very simple example and define few jobs that will be started at our first stage called test (other stages I left commented out and as they are not part of this, but you might like to explore them later).
---
image: docker:29-dind # or use my image https://hub.docker.com/repository/docker/egel/docker-for-gitlab-ci

variables:
  NODE_IMAGE: node:24-alpine3.23

services:
  - docker:dind

stages:
  - test
  # - build   # this stage is usually there but not part of this tutorial
  # - deploy  # this stage is usually there but not part of this tutorial

####################################
# JOBS
####################################

#
# Shell scripts
#
test:shellscripts:
  image: koalaman/shellcheck-alpine:v0.10.0
  stage: test
  interruptible: true
  script:
    - find . -not -path "*node_modules*" -name "*.sh" | while IFS= read -r fpath; do shellcheck -x "${fpath}"; done

#
# Dockerfile
#
test:dockerfile:
  stage: test
  image: hadolint/hadolint:v2.12.0-debian
  interruptible: true
  script:
    - find . -not \( -path *node_modules* -prune \) -name "Dockerfile*" -print0 | xargs -0 hadolint --config .hadolint.yml

#
# webapp lint
#
test:webapp:lint:
  stage: test
  image: $NODE_IMAGE
  interruptible: true
  variables:
    PUPPETEER_SKIP_DOWNLOAD: "true"
  script:
    - npm ci --cache .npm --prefer-offline
    - npm run lint
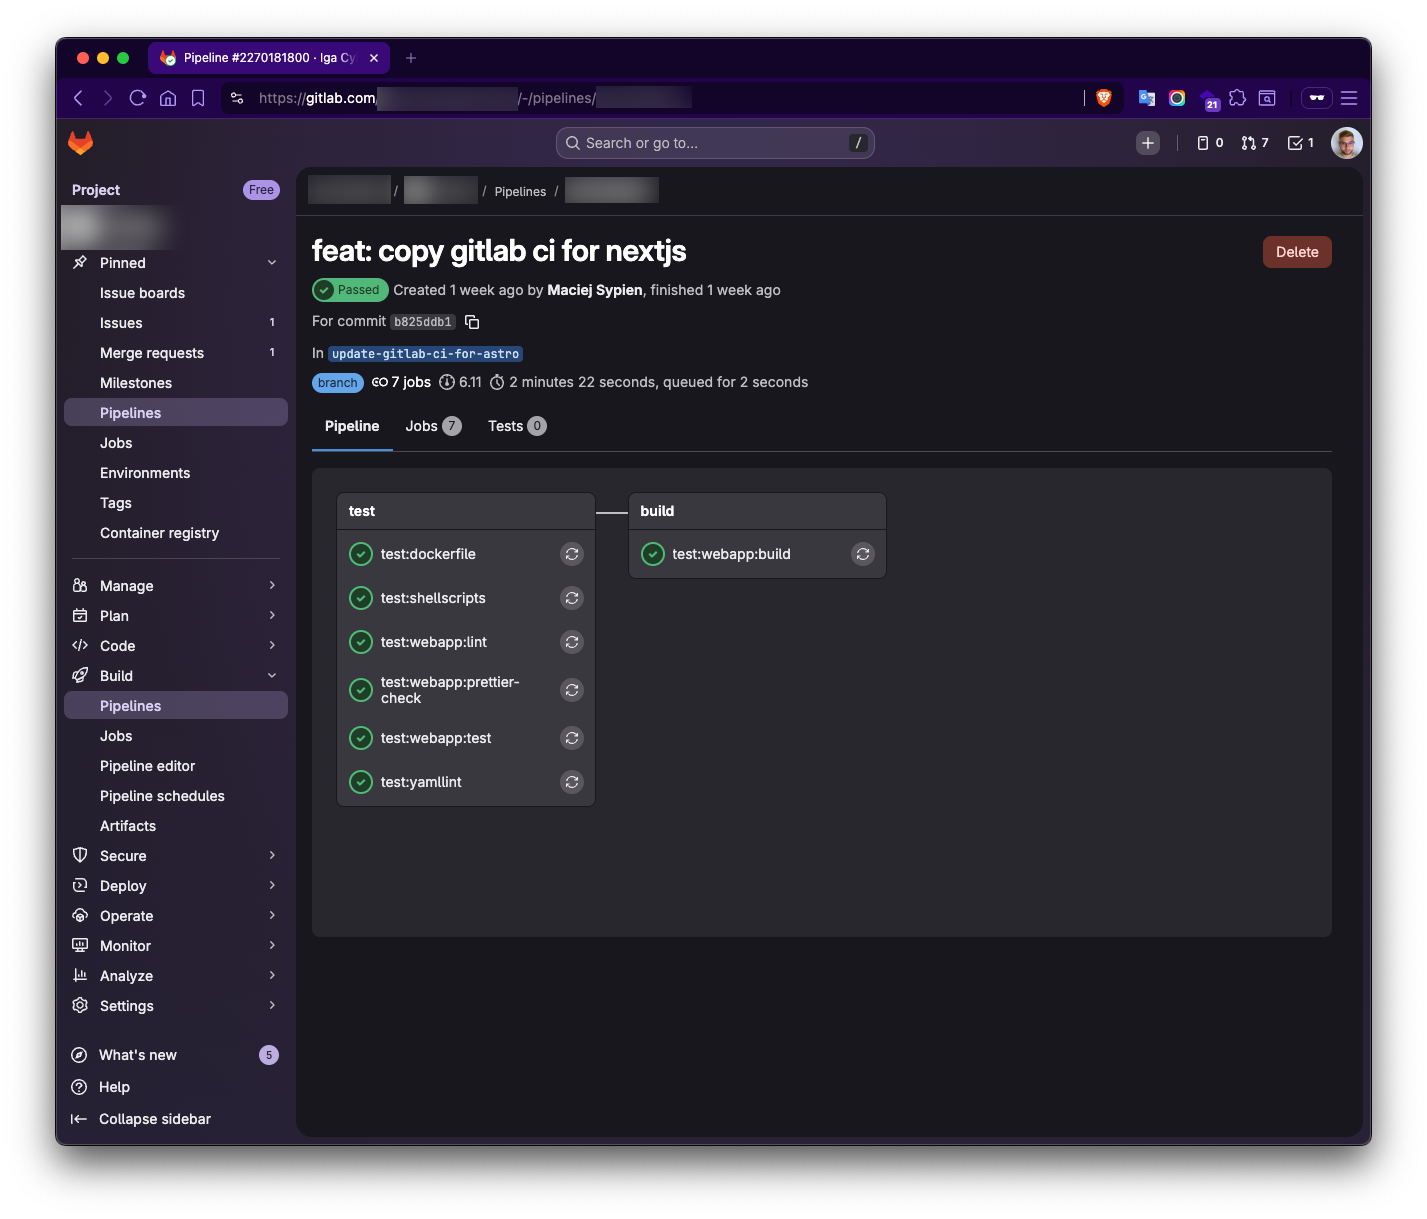
If we create a file, commit it to the repository, and then create a new branch and push the changes (ideally, also create a merge request from that branch), we should see an example pipeline similar to those shown in the screenshots below.

Conclusion
Overall, I think this is a really excellent and cost-effective solution for a solo developer. If you’re already running servers for your projects, spinning up a cluster and leveraging their resources is a smart move. Running a GitLab Runner doesn’t necessitate a static IP address, thanks to the pull principle. So, you don’t need one.
Of course, there are scenarios where running everything on a home server might not be the best approach compared to dedicated servers with constant internet connectivity. This is especially true when using public runners, as you can’t guarantee access if something goes wrong. I’ve found that having a private runner for a solo developer is a fantastic solution. Being able to utilize the power of your own small computers and gain hands-on experience while working on your own projects is truly invaluable.